I had an opportunity to take part in "Collaborative Program – XMC
Forms Early Access" with Sitecore team to play around XM Cloud Sitecore Forms along with few of my colleagues before 6 months, When forms were not released officially, and the purpose was to review XM Cloud forms and provide feedback around it, We had great opportunity to connect with product Strategist Christa Marousek and Senior Product Manager Marina Kostopoulou on reoccurring meetings.
The objective of that program was to get inputs from partner community about forms and give them a feedback and improvise it.
In this blog i will highlight what feedback as a team we gave to Sitecore in exploring Sitecore XM Cloud Forms and how fast Sitecore is bringing those changes to production and for larger community to use, So it is going to be like highlights of "Half Year Anniversary" of XM Cloud Forms and the improvisation in those time.
We focused mainly on following topics
Sitecore XMC Forms Early Access Evolution Criteria.
Basically, We looked at the XMC Form from end user perspective and decided couple of common use cases to start with which were as follow.
1) Looking at the usability and ease of use of the forms
2) Real life use case and compare that with this new forms
3) Execution of the Use cases
4) Trying different validations and form styling etc.
5) Use multiple forms on the same page
6) Create and use multi steps form
7) Creating a web hook and configure that to a form
8) See google captcha integration
9) Deploy the page on vercel and test forms
10) Check file uploads
11) Feedback loop with Sitecore team
Feedbacks which were shared with Sitecore XMC Forms team at that time and how do forms look now
Feedback
we provided THEN
How does
it look NOW
Users were not able to access forms until
they were made admin
This limitation is not present anymore
We discussed with Sitecore team that once form is activated there is no way to change the form, but in real life scenario we will need to change the form, we can not create new versions every time.
This ability was recently rollout by Sitecore, Check the XM Cloud Changelog , So now changes to the active forms are immediately available in XM Cloud Pages, and are automatically applied to all live instances of that form.
Validation were getting fired but we did not see from where we can customize the validation error messages.
This feature was rolled out in February, Have a look at XM Cloud Changelog
File upload were not possible, We gave this feedback how to have file upload in the form, we could not find it.
This feature was released around 10th April, Check the release notes XM CloudChangelog They released it and now in S3 bucket files are stored for 24 hours, Read more on where the files are stored on This Blog
You can not hook any events of onchange or onblur with those form controls, If a developer wants to wire some events on client side, it is not possible.
Not exact same, but there was a feature called "Logic" which was added around 19th March which enables to create dynamic forms containing fields that display conditionally, Depending on the values entered to other form fields, This creates a personalized and interactive experience, Improving engagement and the changes of successful completion of the form. Check out XM Cloud Changelog , Know its detail workings on This Blog
Previously, i needed to go into every form and every control to style it, is there a way where we can create global styles or apply CSS?
There was a feature released along with file upload feature on 10th April called "Style Builder" XM Cloud Changelog using which now user can create two types of styles
1) Visual styles - built with the Styles builder
2) CSS styles - created by saving the style as CSS code.
Apart from above points, There were further inputs which currently are not available in XMC Forms, and which could be part of future releases (We do not have any confirmation from XMC team but pointers were shared with them so their product team can look into this), Following are those.
1) If dropdown has many options, User should be able to type the option, Instead of long scroll to find.
2) Position of the Success and Failure message can not be determined, It comes at the top all the time.
3) There is regex validation but it only works for single line text field & email.
4) Cascading dropdowns are not available.
What else changed apart from above since the launch?
Below are the visuals of before and after change that happened since the XMC forms launch in January 2024
THEN : In early access the form UI was not refreshed to its full capabilities, also icon sets were different and there was no conditional logic functionality available, as shown in below screenshot
NOW : If you compare this screenshot with the NOW version below, you will see that the UI is refreshed and "styling" tab is renamed with "Options", Because now that options tab contains lot more than only styles, and upper icon list now have an option called "Logic" which is responsible to hide and show different controls depending on field values, in table above you can read more about it on the link given.
THEN : In template library section, There was only four options or four categories as shown below, also UI of the button arrangement was different.
NOW: Now, We also get the option called "Shared" that means now templates can be shared with other environments in your organization, also change in button layout can be seen too.
THEN : In initial release, Submit button was not mandatory to be present on the form, but in the new releases the submit button is part of default controls, that means, At start while creating a form, even if you drag and drop any element on the form, submit button will automatically be available along with it, The reason behind is, without submit button there is no purpose of the form
NOW : You can see that submit is part of it by default, as soon as you drag & drop any control.
Also, If you delete the submit button, the editor will show nice little warning about it, As shown below
THEN : We had site analytics but now we also get the form analytics too, so you can also hook different events to collect analytics of forms, There is going to be lot more into analytics events based on the context id of your instance, but that is for the future
NOW :
And last but not the least, as latest as 19th June 2024,
"You can now choose to only make a form available on specific sites in an environment. For example, if your environment includes five separately branded sites, you can create an appropriately branded form for each of those sites. To use this feature, configure the Form available on setting in the form editor, even after a form has been activated. If you don't specify anything for this option, the form will be available on all of your sites." Read more Here
As i write this blog, new features are still being added and forms are getting better and better.
Conclusion
As you can see how fast those feedbacks and inputs were taken into considerations and how fast they were rolled out in public releases, Sitecore XMC has been one of the platform of frequent releases and fast feature rollouts and kudos to the entire team of Sitecore XMC Forms and Sitecore XMC.
Sitecore XMC Form is one of the essential offering and with ease of use by simply drag/drop you could create your branded forms and super power your lead capturing and lead generation.
This one will be very quick blog post, But sharing it here so it helps anyone on the internet having same issue
Problem
We are using SearchStax and we have been using auto suggestions functionality of it, Everything was working fine and suddenly lot of users started reporting that they are not able to search anything in the search box.
As this was P1, I started looking into the probable cause and logs, first i saw in console that we were getting 500 error, that means there is some issue being thrown from the backend.
Upon checking logs found following in logs
The error was "suggester was not built"
Well, I knew there is some issue with suggester which causing it to fail, but puzzle was, It has always been working for us
Now, because we have this error on SearchStax documentation, If you refer below link, it says
"The root cause is often query fields that are not defined in the Solr schema. Look in the solr.log files for index errors; fix the queries; update the schema; reload the indexes; and restart the suggester. The solution is likely to be along that path."
Well, I could confirm that there was no change with schema and on DEV / UAT it was working just fine
Solution
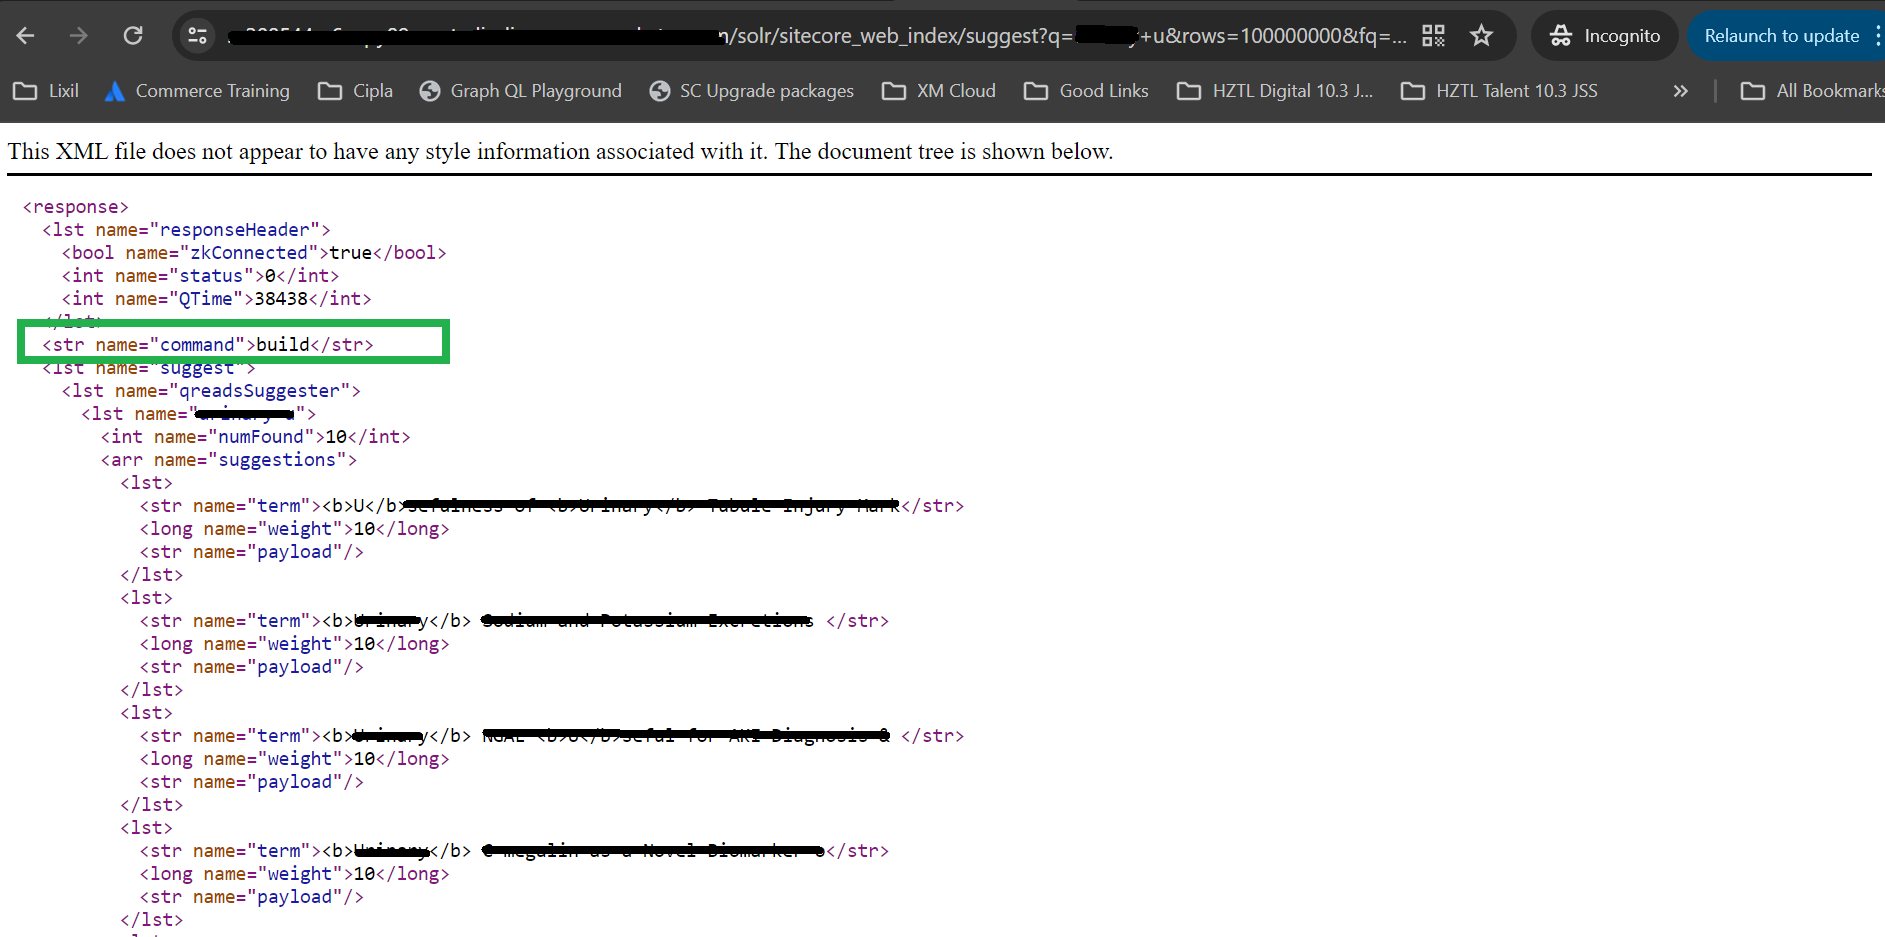
Before creating a support ticket with SearchStax, i wanted to spend sometime understanding it and looking into the logs in details, i got below URL which was getting fired while someone uses auto suggestion search box, and this URL was giving the error
Well, i just tried changing that flag to true in above URL and hit it in the browser, Before this, i never did anything like this, it's new for me too, but well it started working and it was able to built the suggester and live site started showing the results just fine
Though i was able to resolve it, Just to double check this approach and as it was P1 and also to know why it stopped working? I created a ticket with SearchStax for this behavior, Awaiting for their reply & will update this space once i get something around it.
I want to talk to you about interesting things which we have been doing which is "Technical Workshops" for our customers, so here goes the scenarios.
So, we have been doing multiple types of technical workshops.
1) Training customer and their Sitecore technical team on latest and the greatest technologies like XM Cloud & Another composable stack and try enabling them for new Sitecore tech stack.
2) Customers / Potential Customers have their agenda of existing pain points, and we take a workshop on topics around them with best practices etc. little on new technologies, so they also know the future.
Basically, we prepare custom targeted presentations & demos for individual workshops, and make sure it helps them answer their questions and they get insights of where Sitecore eco systems has to offer from their versatile toolset and try to keep them up to date with it.
So, Purpose of this blog is, because in all these customer & their technical team's engagements we get lot of questions from customers around Sitecore & Composable stack and where the world is moving, and I feel all those questions are so valid and so applicable to anyone, so why not to share it so community can know and have answers too.
Some of the questions they get are below.
QUESTIONS
1) We have our own content storage and asset management system in house, where content approval etc. takes place before making it public, is it possible to keep using it and not move to another DAM like Content Hub?
Answer -
Well, the whole purpose of composable is to use "Best of the breeds", That means customers ("you") are in control to select which tools they want to use, You will get the ultimate ROI by utilizing the tools you already have, Provided it has standard eco system of APIs which can be consumed, It could be pluggable but how much efforts is needed is purely depending on the system you use, but answer is YES, You can.
2) Can I select data center of my choice?
Answer -
Yes & No, Because XM Cloud has predefined support for existing data centers, So there are couple of choices.
But for example, if you already have a data center location in mind and if you want to set up XM Cloud for that region, it could be possible that currently that data center does not exist.
3) In XM Cloud, what is the disaster recovery plan? Because things are controlled by Sitecore.
Answer -
Backup and Disaster Recovery All SaaS Products are designed and configured for high availability and resiliency against local outages. Sitecore runs all critical components of each of the SaaS Products in at least 2 cloud provider datacenters in separate availability zones within the selected cloud provider region. In addition, as part of its backup procedures Sitecore replicates the backup of all Customer Data to at least 1 other region (the paired cloud datacenter region). Whenever possible the paired cloud datacenter region(s) are at least 300 miles apart, but this is not always possible given that, to satisfy data residency, tax and legal enforcement requirements, the paired cloud datacenter regions must be in the same geography.
Sitecore will implement and update on a periodic basis its disaster recovery policies, standards, and procedures, and will maintain strict compliance with its disaster recovery policies, standards, and procedures. Sitecore will report disasters (or potential disasters) to Customer Named Contacts promptly upon identification. Sitecore will schedule and test the components of its disaster recovery plans at least twice a year. In case of a disaster, when one of the cloud datacenter regions is disrupted or inaccessible and deemed non-recoverable by the cloud service provider, Sitecore will use best efforts to achieve a Recovery Point Objective of 24 hours and a Recovery Time Objective of 3 working days recovery at the paired cloud datacenter region. Sitecore shall use reasonable commercial endeavours to restore the lost or damaged Customer Data from the latest back-up of such Customer Data maintained by Sitecore.
This is the size that you are storing inside a content tree and publishing to experience edge, if you have media item size more than 50 MB, then it is advisable to use Content Hub to store your contents and not inside Sitecore Media Library.
5)To enable our team for composable stack and XM Cloud, How much of the training will be needed & what kind of training for different departments and what will be typical timeline for it?
Answer -
If we talk about full XM Cloud Enablement for below departments
1) Technical Developers for Headless Development (1 week training can bring them to speed)
2) Content Authors – 3 days of training for “Pages” and “Components” apps and normal Sitecore XM Cloud familiarization training – (2-3 days)
3) DevOps – Creating custom CI/CD, Different hosting options, Understanding XM Cloud Deploy App and things around it, Containerization etc. (1 Week)
NOTE: Above is very customer specific, and very case by case, this was for very specific questions and requirement of training they had.
6) How about GDPR, HIPAA and other
compliance requirements.
Answer -
As of May 25, 2018, the General Data Protection Regulation (GDPR) protects the rights of Europeans to access and control their personal data. This means any brand that markets to prospects in Europe needs to be able to comply with such requirements as transferring an individual’s data to them or deleting it completely upon a user’s request. At Sitecore, we’re working across our organization to ensure compliance with the GDPR and other privacy laws, and understand that our customers will want to know how they can configure Sitecore products and services in a way that will help them with their own compliance efforts.
7) What is not available on XM Cloud which is available in XP?
Answer -
Following items are removed from XM Cloud Features and modules.
Features and modules
XP/xConnect/xDB functionality including existing personalization rules (a new
embedded personalization experience is available for XM Cloud)
Marketing applications, including Experience Analytics, Experience Profile, FXM,
Experience Optimization, List Manager, Campaign Creator, Path Analyzer, Marketing
Automation, and the Marketing Control Panel
Email Experience Manager (EXM)
SXA with MVC, and SXA Search components
Sitecore Forms
Custom search indexes
Identity server
Sitecore Publishing Service
Universal Tracker
Device detection
IP Geolocation
MVC
The Update Center
Roles
Content Delivery
Content Publishing
Forms database
Web database
Web index
Sitecore Identity Server
Device Detection
IP Geolocation
Can you tell us difference between Vercel & Netlify?
Is it possible to make content available or exported from one XM Cloud project to another?
8) What it takes to migrate from XP to XM Cloud?
Answer -
This is a very subjective discussion. But it depends on a case-by-case basis. Some of the factor to be considered are.
Which version of Sitecore XP it is
How many modules have been used.
How much of the content architecture can be utilized and reused.
How many processors/pipelines have been used and many more such factors.
What are the existing systems and how deeply it is integrated?
Are you existing system MACH Compliant?
And many more questions like these.
9) We are using existing geo-location services, is it available in XM Cloud?
Answer -
As the world is moving to headless and XM Cloud works in a headless way, now anything related to GEO IP based attributes will be driven from your front end services like vercel, netlify etc.
This will not be provided by Sitecore, Because XM Cloud will not receive the first request, but it will be front-end application which will receive so XM Cloud will never be able to determine the visitor's location.
10) We are using lot of modules like dianoga and other Sitecore modules, are those compatible with XM Cloud?
Answer -
No. The customer should look at what they are using these modules for and evaluate if they even need anything extra at this time. If the functionalities which your modules are providing are something which is must to have, you will need to think different options which are composable in approach.
So, if we take dinoga as an example, Experience Edge, included with XM Cloud, is able to act as a CDN for the images removing the need for the caching of the asset files. The use of Vercel, or Netlify, or other delivery platforms for the head usually have some form of image caching/optimizing/delivery available with them and this also can remove a major use case for having Dianoga. DAM tools also offer web optimization capabilities, if they have this available to them.
11) We have lot of content and those contents are approved contents, so how do we migrate those content from old instance to new XM Cloud?
Answer -
There are three options here
Serialization - If you are using Sitecore serialization (SCS) and using .yaml files, those can still work and you can migrate all serialized things and use to in XM Cloud.
RAZL - Sitecore provides Razl, which has been tested, which is a content migration tool that is also built on serialization and works with XM Cloud as well. If a customer would like a more visual way of picking and choosing which content gets moved, they can install Razl, but Razl does require a license. A customer can install Razl, connect to their existing Sitecore XM instance, and then also connect it to their XM Cloud instance. At this point, the developer will have a source and a destination and can move content using Razl. A customer or a partner can perform that function.
12) It is said that there is no WEB DB in XM Cloud? Then how publish works? and how all the content are stored in XM Cloud? Does that mean our existing code will break if we have a WEB DB reference?
Answer -
Very good question, It is correct, XM Cloud uses CaaS which is Experience Edge, and instead of WEB in the publishing target, you publish it to "Experience Edge" which geo replicated CDN provided by XM Cloud which comes inbuilt with XM Cloud. https://developers.sitecore.com/content-management/edge-xm
13) We know everyone is going Composable DxP? If we decouple our presentation, Currently we host everything on CD and replicate it and load balance it, but how does it work on XM Cloiud?
Answer -
100% valid question, Here "Unlearning is as equally important as learning", With composable stack, everything is decoupled so, you write you presentation in modern javascipt frameworks like react / NextJS and host them on hosting providers like vercel / netlify etc.
Your backend i.e Sitecore will still have its hosting but that is managed inside XM Cloud only and your publish content goes to CDN i.e Experience Edge
Your front end app to draw the presentation will be hosted platform of your choice like vercel or netlify or azure, and Sitecore provides JSS SDK for NextJS using which you can read content from experience edge and use components created in NextJS to render those data.
Your presentation and content are now decoupled, in XP all were on same CD.
NOTE : All these questions are real questions came from those workshops and which customer asked.
Before ending this blog, just want to make sure i share some of the photos where our team can be seen presenting, myself, my partner in crime Varun Shringarpure & from higher leadership, you can see Hardeep Singh Bhamra supporting us in questions related to infrastructure and cloud engineering for XM Cloud, and those who are not seen in photos but are responsible to make sure our customers are getting what they want were also there with us & supporting us Arpit Shah and Shilpa Darshini
Some fun part, I have been part of these workshops along with my friend and colleague Varun Shringarpure and without his help and load balancing, it's never possible to cover these workshops along with project work and presales work we already have, so let me share a moment capture around 4 am in the morning where we were at the airport waiting to land at one of the potential customer's location :)
Everything should start and end with a smile :)
I hope this blog will get you answers of some of the common questions which are being asked by customers.
If you see above screenshot of my identity server, in "Troubleshooting steps" it is mentioned that "Check the system event log for error messages."
It triggered me, I opened event log of windows, and I could see following error.
Now, i already update my .net run time version according to identity server's config file, which given on following path (also above blog link also mentioned the same step, which i performed but still it did not work)
But it was showing me to download 3.1.0 which I already did, but somehow something was missing, so now what helped me was
in the event log itself, it provides link to missing part, you just click that link, and it downloads that version, for me the link was pointing to following.
After downloading the runtime, it worked like a charm for me & serialization is working and identity server error of 502 was also gone
First of all congratulations to all 2024 MVPs, Last year has been a community year where we saw lot of new MVPs and lot of new content coming from lot of people, Good learnings.
I wanted to share some articles on the real discoveries and headless implementation we did and journey we had and what all things were involved in it etc. but i will bring that later on.
Today i am going to talk about "Component Builder", Amazing tool of Sitecore XM Cloud, Last year i did lot of research and hands on to "XM Cloud Component Builder", Very powerful futuristic tooling provided by Sitecore.
At that time it was still in "Early Access" phase, but now the offering is fully available, i wanted to revisit and provide almost all the info related to it and will also show, How to create fully functional website without writing any code, yes "It is low code / no code".
Last year i presented at SUGCON-2023-India on "FeaaS - Front End As A Service" which talked on the same line, but this blog will cover all what you can do with the component builder, So many possibilities and a new ways of working
You can find the video of the SUGCON presentation on this link here
If you are a podcast lover, You can also see the podcast here too
You can find everything related to component builder and the what / why / how on my PPT here
I will highly encourage to go through the PPT too, because it covers lot of research about component builder.
Let's start with what all you can do with it and possibilities are endless.
How many ways you can create Components in XM Cloud Component Builder?
There are majorly 5 possibilities in three distinct categories using which you can create components, Sitecore has not bifurcated xm cloud components in these three categories, it is just me breaking them down into these three categories for better understanding.
1) Static Components - By using elements available to be dragged & dropped onto the canvas
Static components means, very quick and dirty way to create a component, basically you just use the component builder canvas and start drawing different elements like inline or block elements ex. H1, H2 or paragraph, cards etc. and start putting contents into it, You can even copy and paste contents from existing site and it will try to adopt its styling too.
When you stage it or publish it it gets stored as azure blob as a web components, it will have its own HTML tag and everything will be wrapped under that html tag, (Read more in my PPT about all these)
In the example below, I took https://www.sugcon.events/ site as an example, if i want to quickly just create simple component out of it by using static components approach
The moment i "Stage" the component, it will be available for me to use it on pages, all these information.
2) Dynamic Components - By using external data sources and mapping them to elements, Here before creating a component, first what you do is "Create a datasource", And to do that you go to "Data Sources" tab and start adding data sources of your choice, In below image you can see i have three types of data source created
All these three are explained below.
Using Static JSON and map fields with elements
Here, use case can be if you have a service which is behind the fire wall, and you can only hit it once to get the response and you only have that JSON, Or take example of sugcon speaker list, that JSON is static once speaker are locked and it will not change, so in this scenario, you can just take that JSON and paste it in the "Paste JSON" tab option while creating a data source like following
Consuming an API which provides JSON and map the schema with elements
You can actually make a call to your REST APIs or any APIs, which returns you the JSON results, and make use of that.
Using GQL by reading external services
Use cases for GQL are many, any content which is out there on experience edge or edge network or anywhere which supports GQL query, you can use that to retrieve data map it with your component, in below example, I am getting featured blogs from the context item, which is returning me the JSON schema.
By using a standard Sitecore data source and use those fields to map it to elements, this being detailed one, I have a separate blog for it, I will update the link once the blog is out.
3) BYOC (Bring Your Own Code/Components)
BYOC is the way developers can Bring Their Own Code into XM Cloud Component Builder, that means if you have your react or NextJS component library already created, you can actually use them straight into Pages in XM Cloud.
This is one of the powerful feature where your existing library can be included with simple steps and you will get that ROI (Return On Investment) because your existing code will be still reusable
I have blogged in detail about how to create and use BYOC in XM Cloud, I will also link that blog here once it is published.
I hope it gives you idea about the power of component builder.
It has been amazing learning year so far and with the change in technology and shift of the focus on frontend frameworks and composable products, it has been market demand to keep learning and exploring new things.
Reasons behind this blog
Today's topic is something that was in my draft from April-May, and I always thought that there is already a good documentation out there for Leprechaun and a blog post is not needed, Until I realized that there was so many of us facing same kind of issues and same kind of problems and spending same amount of time, That is where I thought, if I could write something which can reduce that repetitive troubleshooting time, That would really help the community.
1) In a project environment, if we get into some configuration issues, we resolve them, we make sure we are not blocked and continue, but if you think same issue, same step and same scenario will come to other people, so if we can draft it online, it will help other people
2) I was aware about point-1 but I always thought with standard leprechaun documentation, everyone will be able to get it working and hence I never drafted my learnings and issues which I run into and steps I performed to resolve them until when lot of people were asking the same question on the floor, in different team who are configuring leprechaun, or over the slack channel, and that is where I strongly thought to draft those steps and learnings and put it online for people to refer to reduce the troubleshooting time,
3) I already drafted common troubleshooting that one will need if you are working with Sitecore XM Cloud starterkitXM Cloud - SXASTARTER Kit Setting up Leprechaun Exited with Code 1 Error (daivagnananavati.blogspot.com) around in May, But I still did not considered steps required to configure leprechaun before troubleshooting it and I always still thought, People will be able to configure it and did not find a value to write them down.
4) But I was wrong, because only troubleshooting steps are not connecting the dots, I was still replying to same questions which I was getting from the community and from team members around, that means there was still a need of step-by-step guide of configuring leprechaun, and that is where I thought, it is definitely worth putting the steps and guide in place to save many hours of work people are doing in same repetitive manner and getting stuck in same questions.
And that is the inspiration behind this blog. and I also did a webinar on it to show what is the step-by-step guide to configure leprechaun for code generation. (Video is attached at the end of this blog)
What is Leprechaun & Why we should use it?
I believe there is a strong awareness about it from the community and the GITHUB link of Leprechaun.CLI from Ben Lipson is just great to get started and understand things around it, so I will not focus on that but will jump directly to minimum steps involved to start generating code from it.
Steps
Step -1: Install Leprechaun
Very first step is open windows PowerShell and go to your root directory where you have .config folder (or where your dotnet manifest file), If you are using XM Cloud starter kit, you will already have .config directory in your root project, so go to the directory inside which you have .config directory and fire below command.
dotnet tool install --no-cache Leprechaun.Cli
After executing this command, you will see success message that it was installed successfully, like below.
Once, it is installed go into .config directory and open dotnet-tools.json file and verify that the file is updated with leprechaun tool entry, that means your step-1 is finished properly.
NOTE: If you see a success message like above image but still do not see the entry in dotnet-tools.json file, Make sure to correct your path, it could be you might have installed it globally and .config was created elsewhere in which you fired the command, if you have correct path, The entry will made to this file.
Step-2:Download Leprechaun.config file & CodeGen files & modify it.
Download the file from here, you will need to modify it to suite your need and your structure, I have created a sample file which you can download from my GIST here, which has all modifications which are required.
Note - Best practice is to put the leprechaun.config file on the same level as your working directory or where your Sitecore.json file and .config folder is residing, but you are not limited to it, you can put it anywhere, but in that case, you will need to make sure all path inside that file is reflecting it too.
Because the paths in leprechaun.config are always relative to $(configDirectory) (configDirectory is the full path to the directory containing the root leprechaun config file being used)
Let's discuss the modifications you will need to do.
1) Once you download the file, first thing you will need to check is the import attribute on
<configurations import="**\*.module.json">
This path will differ depending on where your Leprechaun.config is and where is your module.json file, the import path will vary depending on that.
In my example I am using default start kit structure, so my module files are directly under src folder.
If this path is not configured right, you will end up with one of the Issue No. 4 of Step-4 below (end of this blog I have drafted some frequent issues that might come due to misconfigurations)
2) Second thing is giving the name to the configuration tag like below
Above name attribute should exactly match with @extends attribute of leprechaun configuration instruction in your module.json file, I have drafted further details of it in Step-3 below.
If you have misconfigured this, you will end getting Issue No.-2 (Point-2 from below list of issues I have given at bottom of the blog)
3) Update the scripts and output file attributes, scripts attribute means which code generation file you want leprechaun to use, you have to specify that path, and output means where you want leprechaun to output the generated file
I am using the type of script code generator created by David Ly for which PR is already out against Lerepchaun, but you can use other types available there as well.
Here is how my configuration node look like, and I will also show you the file structure so you can relate with the paths.
Make sure again you enter correct path, else you might get file not found exceptions, but in above "CodeGen" is a folder in which my JssTypeScript.csx file is residing.
Below is the file system structure look like.
Now it is time to update module.json file so that our configurations which we did can start reading them.
Step-3: Update module.json file with leprechaun node
Because leprechaun does not need live Sitecore connection to generate your model, and it only needs persisted *.yml files, Let's put instructions in the module.json file of your choice for which you want to generate the code, it can be your typescript model, it can be model for your templates to be used in custom resolvers, choice is yours.
So, here I am interested in generating typescript model and hence I am giving configuration of leprechaun in my DataSource template module which I already have, here is a my datasource.feature.module.json look like
In above configuration, there are two major instruction that you should configure very carefully and understand.
1) @extends - This is the name attribute of the <configuration tag of leprechaun.config (will show it in a while), That means the name attribute inside <configuration tag of leprechaun.config and @extends value should match exactly for leprechaun to work, See below image
2) @name - This should match with your {Layer}/{Module} path, Meaning, in Sitecore if you have different layers like Feature / Foundation / Project and inside that you have a module, and in which all templates are residing
So, when you run serialization, it will create those physical yml files using those paths, This Name configuration is responsible to match that, whatever the name you give, it should be valid "path" yml for serialization.
For instance, in above example in @name, if I give anything other than Feature.LeprechaunDemo, it will not work and give me error because it will not be able to find any items on that path because it only and only needs Feature.LeprechaunDemo as a name because that is where my items are in Sitecore and all yaml files which got serialized have those paths in it.
Step-4: Run Leprechaun command.
Leprechaun command can be run in two ways.
1) Running it from the command prompt.
Go to the directory where you have configured leprechaun (your $configDirectory) and fire below command.
dotnet leprechaun /c "<<Path where your leprechaun config is>>\Leprechaun.config"
If everything configured fine you will see a success message that model was generated successfully like below
2) Include it as a part of the build process, so at the time of build it will run leprechaun.
You can create .wpp file in your project if you would like to run and generate these models as a part of the build process, it runs the same above command, configuration you will be putting is like below.
<TargetName="Leprechaun">
<ExecCommand="dotnet leprechaun /c <<Path where your leprechaun config is>>\Leprechaun.config"/> </Target>
Step-5: Troubleshoot: You will come across common issues before you get it working.
I have drafted some common issues, that you might be running into when working.
With Sitecore XM Cloud Starter kit, there are below two issues which might come.
1) One of it is "Leprechaun runs fine but it does not generate any model files",
2) If you run from the build process, you might also get "Exited with Code 1" error
1) Missing expected 'path' attribute on 'include' node while processing: <include name="Templates" />
This is because if you have downloaded the leprechaun.config file from the GITHUB link, On the line no. 102 it is missing "Path" attribute, Giving a proper path like below.
NOTE: You can use my GIST here directly if you want to use that file and change it, feel free to use that, it has all the modifications.
2) There is an extend inheritance loop, or a container extending a nonexitstant container name.
This is again a mismatch in the extends property in module.json and the name of the <Configuration node, make sure leprechaun.config file configuration name and @extend is matching and other string values are just fine.
3) Item data was null for the provided treenode.
This signifies that serialized data on the disk and your module.json configuration are not matching, or either it is out of data, basically that means either something was renamed in Sitecore and synced for which the leprechaun configuration in module.json file was not updated, Double check that and see those things match.
Example can be, you renamed your module name like from demo to demo1, so on physical disk when you serialize things. It will now use demo1 in the path, so leprechaun.config should also change to reflect that name instead of demo.
4) Loaded metadata with 0 configuration (0 total templates), No modules are being found by configurations.
This is because in your leprechaun.config file the import attribute is having a wrong path and hence leprechaun is not able to find any module.json on that path, Plese check and correct the path in following node.
<configurations import="**\*.module.json">of leprechaun.config , this path depends on your repo structure
Conclusion & Some Take Aways.
1) Leprechaun does not need connection with Sitecore.
2) Leprechaun.config files(s) is always relative to $(configDirectory) (configDirectory is the full path to the directory containing the root leprechaun config file being used)
3) No need to check in the generated model files, if you have set up leprechaun to run it with build, it will help you to avoid those merge conflicts in auto generated files.
4) You can have multiple leprechaun config if you would want to have a separate model generated and different code generation to be used, Example can be for my DataSource template I want to generate type script model and for my page templates i might want to generate C# models.
I did conduct a training session on these configurations, you can refer to below webinar too for further learning and understandings.
With this blog, I hope to save some troubleshooting and configuration time you might run into.
Feel free to buzz me or comment or find me on social media and buzz or connect for any kind of conversations.
Special thanks to David Ly for creating this type script code gen file and Ben Lipsonfor leprechaun tool.