Getting started with XM Cloud Introduction repository - Step by step

August 23, 2022 ·

Getting started with XM Cloud Introduction repository - Step by step

Hi Folks,

We have heard so much about XM Cloud and its capabilities and whole composable approach towards DxP

I so wanted to get my hands on to something as soon as it is out, and i was constantly following the news and articles to get some info out of it, There were so many good webinars and sugcon sessions on it giving very insightful info, But as a technologist, until and unless you do not get touch and feel, you are not satisfied.

So it all started with the end point which i got in my research (of course now it will out, but i think the documentation and all power shell commands etc are still behind the credentials on this link 

I already have a blog post in draft mode, about different terminologies to understand the bigger picture, Because when you start exploring XM Cloud and researching, there are so many different things which have been shifted to a new engine and lot have been modified and clubbed etc so understanding the terminologies like XP, XM, Symphony, Experience Edge, Headless is very important before you start your journey to explore further, i soon will be publishing that blog.

Sitecore's "Techno Marketing" team has code-base with series of sites built against the per-release of XM Cloud and the full repository can be found on below link.

https://github.com/Sitecore/XM-Cloud-Introduction

Let's get started

Step-1

As usual, Make sure you have the prerequisites installed, it demands 

Step-2

From the repository URL (Given above), once you get the repo in your local, you can follow the steps mentioned in the documentation so that means first you will need valid license, so for me i already copied repo to my folder and i have kept latest license file at my preferred location now , It's time to run the command to set up the repository in local mode, using following power shell. (Make sure you are in the same folder where you repo is before you run this command)

.\init.ps1 -InitEnv -LicenseXmlPath "C:\Daivagna\2022\license.xml" -AdminPassword "<<your password>>>"

It will initialize things for you and set host names and licenses etc like following screen, all knows drills which you might have one before for other Sitecore docker instance previously.


Step-3

Once things are fine on Step-2 and no exceptions or anything, next step will be to bring up all the containers required to run in local mode by running "Up.ps1"

in the powershell next script you will run will be .\up.ps1, once executed it will take some time to bring up all the containers 

I think before you do this, it always good to check if you docker is running in windows container or linux container, otherwise you will end up getting below exception and build will fail, so it is better to change your docker to windows container mode before executing the "up.ps1"

I got below exception 


Which says

"------
failed to solve with frontend dockerfile.v0: failed to create LLB definition: no match for platform in manifest sha256:c827903a303cb7a76214adb4376e462a241b3cd763cb88655cd901c5a0e867a0: not found
ERROR: Service 'solution' failed to build : Build failed" 

Also in one of the logs it was saying "image operating system "windows" cannot be used on this platform", It clearly means that its build on windows platform and if docker is running on linux, this is not going work.

I switched my docker to windows container and again run the script, But this time it came with a different error (Before that i also restarted my terminal, just because one of the script above is saying that you might need to restart your terminal, so i just did it just to avoid any issues) 

Got below error

"a Windows version 10.0.20348-based image is incompatible with a 10.0.19044 host" 


Frankly, i did not much about this, but what i knew is that what it is saying is, the image is built on the latest OS version and because i am running it in my local, and my local is windows 10, so i needed to find some way to make it compatible.

Basically, its the Microsoft nano server which are compatible with build version of the docker image, It clearly says in step 5/14 of above image that what version it is using, somehow i will need to change that to a compatible version to run it my local windows OS.

So, like old school, i tried searching this text in the repository i download from GITHUB, and script is reading these settings from the ".env.template" file


I needed compatible entries here, and frankly i had no idea what should go here, so more research was put in to find the right compatible entries for local windows OS. Read my BLOG here

https://docs.microsoft.com/en-us/virtualization/windowscontainers/deploy-containers/version-compatibility?tabs=windows-server-2022%2Cwindows-10-21H1  this article explain things very nicely

Well, i saw that in this file there are other entries too of SOLUTION_BUILD_IMAGE and SOLUTION_BASE_IMAGE

i just tried to use same entries for NETCORE_BUILD and NETCORE_RELEASE and only difference was instead of latest 2022 it should be compatible which is 1809, so i tried those entries, but still it was giving me same error

now there was no reference of 2022 but it was still showing me same error, and because it was stupid of me instead of changing .env file i was changing the template file itself in the visual studio :) 

Now this time i went to a folder structure and made these changes to .env file from which docker-compose read the values......and it worked !!! 

 but issues now i had was, it was now giving some other error like following

"solr-init and the container is unhealthy" and i tried to look for the specific logs for that particular container and i found something like following 

"unavailableexception: error processing request. corecontainer is either not initialized or shutting down docker"   

The same error is mentioned here too CoreContainer is either not initialized or shutting down · Issue #29 · Sitecore/MVP-Site · GitHub

I did not have much clue to this, what i was understanding is it is not able to get the core, well solution was just to delete configsets , filestore, userfiles, zoo_data folders from following folder.

"/docker/data/solr" 

and once done, just run the .\down.ps1 and .\up.ps1

Thank you Jatin Prajapati for suggesting me to try above, deletion and start over, i had no clue from the error that it needs a fresh start.

it all started working without any issues this time , and i was able to see the following authentication screen 


and After confirmation, you will get a success message 


After few steps and execution, if all goes well, you will be able to see console is asking for your user name and password to login


You will need to create a new account as it will be created on Sitecore cloud, once you create an account, it will send an email to your email to verify the account and once account is verified and all looks ok, we will be able to see the launchpad 


I was pretty excited to see this, just like i was excited to see SC09, SC10 first time, new way of working, freshness and the weightlessness, and excitement of getting deeper into its understanding.


A Windows version 10.0.20348-based image is incompatible with a 10.0.19044 host

August 19, 2022 ·

A Windows version 10.0.20348-based image is incompatible with a 10.0.19044 host

 Hi Folks,

Recently i was trying to explore XM-Cloud and the repository provided by Sitecore technical marketing team from GITHUB

I followed all the steps but i was trapped on following error 

Problem

A Windows version 10.0.20348-based image is incompatible with a 10.0.19044 host  docker

See below image, what i was seeing


Solution

Basically that error is saying is that the image is built on the latest OS version and because i am running it in my local, and my local is windows 10, so i needed to find some way to make it compatible.

Basically, its the Microsoft nano server which are compatible with build version of the docker image, It clearly says in step 5/14 of above image that what version it is using, somehow i will need to change that to a compatible version to run it my local windows OS.

https://docs.microsoft.com/en-us/virtualization/windowscontainers/deploy-containers/version-compatibility?tabs=windows-server-2022%2Cwindows-10-21H1 this talks very nicely about all these versions in details

Also good information of what are our options for if the container was built on higher version and in local we want to be compatible given n https://hub.docker.com/_/microsoft-windows-nanoserver 

So, as you can see in below image, RED is the actual values which got shipped with repository and green is what i changed to

Basically, i copied SOLUTION_BUILD_IMAGE value to NETCORE_RELEASE_IMAGE and SOLUTION_BASE_IMAGE to NETCORE_BUILD_IMAGE


 After that things were smooth and container was built successfully !!!

I am sure because this repo is built on windows server 2022, if we try to run it locally in windows OS, everyone is going to get the same error, so hope this will be helpful

Happy XM-Cloud troubleshooting :)

Sitecore SXA wild card redirect from language code url to non language code url

July 20, 2022 ·

Sitecore SXA wild card redirect from language code url to non language code url

Hi Folks

This will be a quick post as i wanted to quickly share this scenario and i am sure it will be helpful for many of you as it includes SEO inputs and how we had to change few things to support it


Scenario

Recently we changed the implementation of our sitemap generator as it was not respecting the "language embedding" flag, which is a known issue mentioned here , so we had to overwrite it and make our own to make it work, but all good so far so now our site map did not have any URLs with language code appended to it.

But our SEO team came up with the analysis that there are users still going to 404 page because of they are hitting URL with the language code, Although we had that flag to true in Sitecore.config settings


So, Logically all pages should be accessible only without language code in the URL

Now, we knew that if we hit pages with language code they are going to 404, but our SEO team insisted that it should go to the actual pages with 301 redirect, and it should happen site wide because of either old URL book marked or search engines might have references of it and if someone is coming from there.

Solution

Well, SXA redirect module is there from the inception but till now i only did one to one mapping of OLD to NEW url, but in this case we wanted to identify the language code (we only had one language i,e "en") in the incoming url and wanted to redirect users to non language specific URLs and that is where i started playing around with wild card pattern in the SXA redirect module.

Question i had was i will be able to write the pattern for incoming URL but how can i redirect user to pages without the language code? that is where TOKEN came into picture 

SXA redirect module provides tokens like $1, $2 and so on which will be replaced by corresponding strings from the input regex

so now it was time to test things my left side regex was like below (or refer the screenshot on the top to see how mapping was done to achieve this)

^/en(/.*)$

and gave its corresponding URL on right hand side as "/$1"

that means, redirect all incoming request with language code to the corresponding page without the language code

I tested and it worked like a charm !!! and now we did not have any users landing to error page if they hit pages with language code in the URL.

I hope this will help someone looking for something like this.

SXA creative exchange export error "Export failed. There is no storage definition in the site"

July 10, 2022 ·

SXA creative exchange export error "Export failed. There is no storage definition in the site"

Hi Team,

One more amazing troubleshooting day, And this is when one fine morning one of the developer in our team raised the FLAG that she is not able to export pages using "Export" button available in ribbon in experience editor and she was getting below exception in export wizard, and surprisingly in content editor, "Creative exchange" section and their export/import button were not showing at all.

"Export failed. There is no storage definition in the site"


We use azure virtual machines so she had the same copy as mine, and it was working fine on my machine, so my troubleshooting started, i was not expecting anything major out of it as i thought there must be something minor going on or some access issues as she was playing around with access to Sitecore items but it turned out something else and it took couple of hours to figure out what is going on, following are the steps which were performed to troubleshoot the issue.

Troubleshooting steps performed

1) First thing i checked was if there was no security changes that was done which was preventing the creative exchange not to work, but everything was fine there, user was admin and all roles were just fine no modifications there and no Sitecore item was given security policies 

2) I overwrote BIN folder from recent back up and all configs too, just to avoid any possibilities of any recent config changes etc developer might have done in their local, but no luck, so first conclusion was that there is no config issues of any kind.

Surprisingly, If you search this error google was not giving any fruitful results to understand whats going on 

3) So, next because SXA site gets resolved using host name, target host name and language settings defined in Site grouping, i made sure there are no issues there and correct settings are selected, but everything was just fine there.

4) There was no hints on the LOG, no error or exceptions.

5) I double checked Site Manager to make sure there is no site resolving issues while export but all looks fine there.

6) I did compare ShowConfig.aspx  of my machine where everything is fine and that developer's machine's ShowConfig.aspx and everything looked same to same, all pipelines and flow was just there are evereything was fine set up wise, so second conclusion was there is no issue with SXA module set up as site and everything works just fine.

7) I even remapped the module of "Creative exchange site set up" in the site and re-installed it by right clicking site and installing module for site and selected "Creative exchange" but same behavior and no luck.

8) I observed the the error and it is not able to find the storage definitions, so i double checked that and all settings are fine under site like below

9) Now, Because our SXA solution is multi site solution and having multiple site, i tried to check export in another site and it was working just fine there, now i was 200% sure it is issue with some kind of settings on site level.

10) So i double checked all settings on site level and everything was same to same, and i compared site grouping of both the working and non working site, and with my surprise culprit was below settings


So when "Enable Preview" was false the in content editor it was not showing creative exchange EXPORT/IMPORT  buttons too, and in


experience editor it was showing "Export failed. There is no storage definition in the site" message

and when you turn that FLAG to ON, everything worked fine, content editor started showing those ribbon buttons too and experience editor started working too, see below screen, in content editor the moment you click "enable preview", it started showing export and import buttons and also export in experience editor started working


Solution

If "Enable Preview" is OFF, export is not working so turn it ON, and export and import will work just fine and some how the radio button in "Export window" also started showing correct options of "Zip file" and "Folder on the server" both started showing too and export worked just fine.

Some further digging
 

After finding out the solution that it works with "Enable Preview" ON, i further tried to de-assemble the "Sitecore.XA.Feature.CreativeExchange.dll" and tried to find the root cause which are following findings, i am still working on to get the the exact conclusion but findings till now are following (Sharing, So that if anyone is interested in knowing and have any inputs to that)

 There is a class called "ExportWizard.cs" in "Sitecore.XA.Feature.CreativeExchange.Wizards" namespace which is responsible to show the export wizard with all options 


I will show you the implementation of this method in next screenshot from where the exception message us being shown, but if you closely see this method, it takes HOME ITEM, and that home items is coming from below code


this "GetSiteInfo" is under my radar and it seems, it is not getting the right context of the site and hence, Sitecore thinks that its not SXA site and not showing those creative exchange button and giving export exception, but i will have concrete findings in my next blog, but main method which gives export error is below in the code 


Troubleshooting continues to find the root cause...

Webinar - Hands on to "Sitecore 10 Content Serialization (SCS)"

June 19, 2022 ·

Webinar - Hands on to "Sitecore 10 Content Serialization (SCS)"


 Hi Team,

At Horizontal Digital , we as a team decided to create set of webinars and online sessions for developers to help learn new concepts of "Sitecore 10" offerings.

As a part of that, different team mates started preparing for Sitecore 10 new features so those information can provided to the team and they can all push and learn SC10 in much better way and those topics can help them in their certifications too


As a part of those different webinars, I took the topic on "Sitecore Content Serialization (SCS)"

In SC10 certification one (out of many) competency is "Content serialization", We all have been working in TDS, Unicorn tools to serialize the content and use it to share, deploy sitecore content, but with SC10 there is a new way of serializing content.

Basically there are two ways which we can use SCS

1) Sitecore CLI : Is a dotnet core based command line interface, we can install nuget modules on top of this for SCS and we can start using Pull and push commands to serialize items back and  forth to/from Sitecore, No license is required

2) Sitecore for VS (SVS) : A developer can download Sitecore for VS Module VSIX package and install it in their VS studio, Existing TDS License will work otherwise one will need to purchase TDS license.

I will not write all the details of what are the perquisite to get started and what all GOTCHAs as i already have the below recording where i have shown complete DEMO and hands on of SCS

 Session can be found on following video

Hope you get your hands dirty with above demo and get started with SCS... 
High CPU to completely normal CPU - SXA issue, SXA pages not loading in mobile device

June 09, 2022 ·

High CPU to completely normal CPU - SXA issue, SXA pages not loading in mobile device


Hi Team,

Today i am going to share one of the nightmarish issue with you all, We are having Sitecore 9.1.1 hosted in azure PaaS environment

Our site was working just fine and no noise, but we have been working on a feature release where 7-8 months of development needed to be released to production, Big GO LIVE event right? 

Also to make the development smoother we also introduced BLUE/GREEN deployment slots in the same release, so we can easily SWAP slots and go live

Everything went well, we went live, we even did load and performance testing on our staging and pre-prod and we were confident enough of results

Very next day we started getting "SITE DOWN" alerts, and also product owners and clients mentioned that site is very slow for them in US time and in our morning when we were accessing it, it was working lighting fast so we were clue less at start, but we started digging 

1) First thing caught our eyes were HIGH CPU spikes, in US time, also without any traffic CPU used to spike to 100% and it never used to come down until we restart the azure app (see below it used to stick to 100% for hours)


2) There was nothing helpful in the logs, apart from couple of exceptions but we resolved them and still CPUs were high

3) Nothing helpful in application insights too

4) All the roles like processing, reporting, xDB, refdata were looking just ok and no CPU spikes there, We observed that "pools db" was having high DTU, but after re indexing the index, it also came down but CD CPUs were still high

5) We tried up scaling the plan from S3 to P2V2 also we increase REDIS CACHE from C1 to C2 to try our luck, but NO, CPUs were never coming down

5) Because we were in azure PaaS, We enabled proactive CPU monitoring to make sure when CPU goes above 95% for a minute, It should take the dump (*.dmp)

6) We got couple of dumps, and most of the top 5 calls were showing one specific component that we have on the page

7) Another analysis we got was CPU spikes are only happening after we went live, before that it was stable, and with our surprise that component was reusable and it has variants of different kind, and it was already present on other pages but it was not having any issues there 

8) So, now we started to find the difference between what is the difference in presentation detail of those pages and our new pages and there was nothing eyebrow raising apart from few different components

9) We again got back to our dump which were taken when CPU was high, we had couple of dumps and it was pointing us to one common rendering which we have used, following is a quick snapshot of our dump

TOP 5 Threads by CPU time


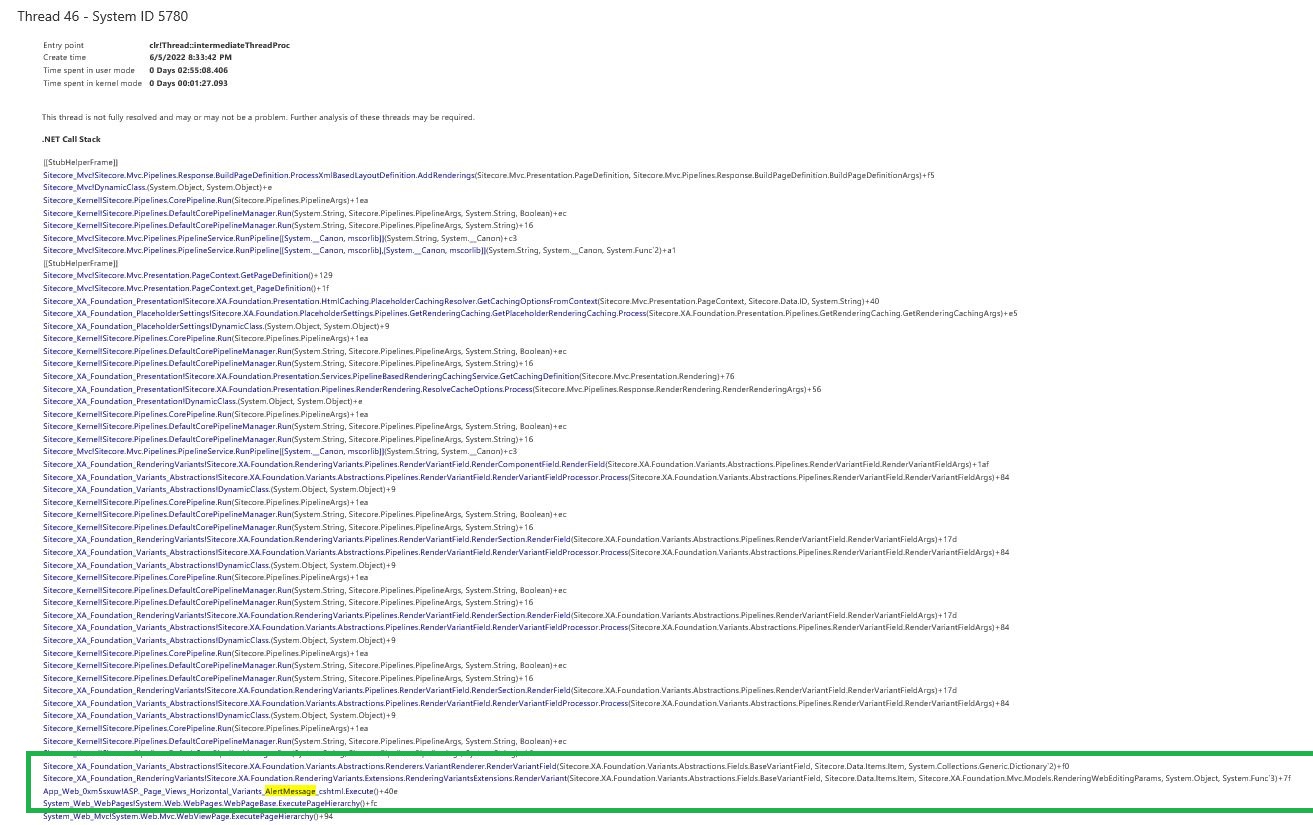
Now it time to look into these threads, so Thread 46 and 45 were pointing to our problematic rendering , In below table dump is showing the problematic page and on this page we had that rendering which was causing issue.


Upon inspecting further to see what this thread is executing, we saw our culprit 


and all the dumps were showing these new pages only with which we went live, with our surprise these renderings were already being used on other page but no issues there, so we concentrated to look into this component in detail

10) So now our issue was because our new pages were using these rendering excessively, we plan to remove them from our stage environment as issue was there too, so we renamed the placeholder keys in presentation details so these do not get rendered and with our surprise, next day CPUs were absolutely normal, So it was our first success in identifying that issue is with any specific variant of this rendering, because rendering did not have any issues, any particular variant had some issues

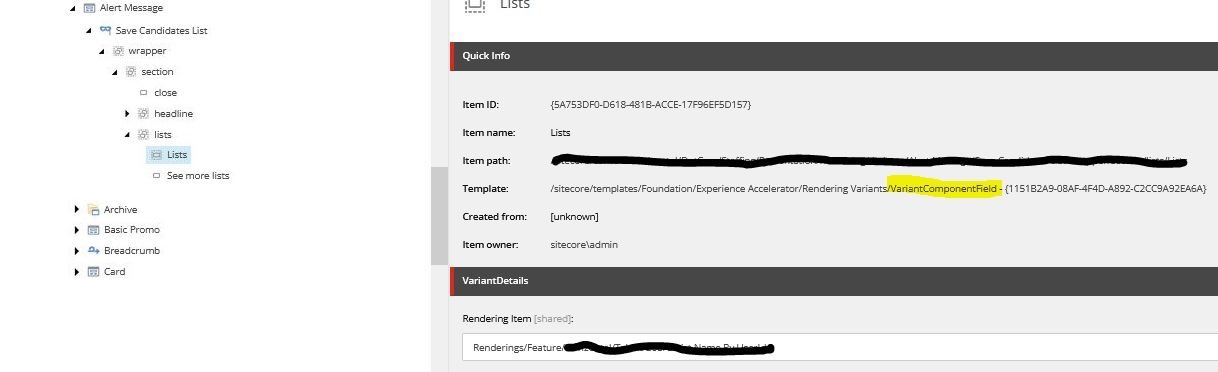
11) So we started looking at one by one variant their data sources to see if there is any specific operation being done which is causing this? in that process one rendering caught our eyes which had used "component" field in the variant like below


12) Now we used "component" field which is calling one more controller rendering from inside of it, so first thing i did was, i commented the complete back-end code i.e i commented everything inside that action method and returned empty result, so that if any back-end code is doing anything we can get rid of it and CPU should come down, but with my surprise CPUs were still high :( 

13) But if we remove that rendering item completely from component field's reference, it was working fine, which was even more disheartening, because now its not our code but something else in sitecore doing this and making CPU high

14) Believe me till now we were clueless and were thinking to remove this component and use something else, but we thought to revisit our DUMP to see if we get any other hints and what we got was below 


 Well, we were observing device specific code getting executed too, so we also tried disabling device detection but no luck with rendering enabled nothing worked

15) Because it was showing devices, we tried to browse the site from mobile and suddenly it caught our eyes that those pages which had this rendering variant were not opening in mobile device and they were giving 504 bad gateway error page.

Well, At this point of time we were 100% sure that these things are related, so finally after lot of dump analysis and research we found below

Finally the solution

Now, we had 100% scenarios that when someone visits pages with that rendering variant from mobile CPU was spiking up, and that rendering variant was only available after post login, and our team mate Akshay Barve pointed to one of the KBs titled "Illegal recursion detected", with our surprise it clearly mentioned below 

"SXA website pages might fail to load with a high CPU usage and an unhandled exception if the page is requested with a mobile device or in the mobile mode of a desktop browser. The root cause of the issue is an infinite recursion on page load when using a component variant field for a mobile device"

Strangely we were not getting these logs otherwise we could have captured it in initial findings, we tried this patch and it worked like a charm and our nightmare was over, after this fix CPUs just slept and were able to take large number of requests and was able to hold huge traffic.  

But in this troubleshooting journey we did so much of other things, we got rid of exceptions which we were coming, we touched performance parts for which i am going to write one blog post of what all we did, so its all learning...

Hope some of you will find this helpful and get early help if this weird behavior happens !!!

Many thanks to Muktesh Mehta and Kiran Patil for helping on this troubleshooting and taking out time from their busy schedule, and providing valuable inputs, Much appreciated !!!

Sitecore OrderCloud exam tips & tricks

May 11, 2022 ·

Sitecore OrderCloud exam tips & tricks


Hi Team,

Recently i appeared for OrderCloud certification exam and though everything is available on the OrderCloud web portal Platform Overview | Sitecore OrderCloud & on Sitecore e-Learning portal, but what i want to share is some ideas of what kind of questions or what is the pattern of questions and what is the best way to prepare for this exam

Amazing documentation of OrderCloud 

First and foremost is the documentation available on  Platform Overview | Sitecore OrderCloud itself, but when you first start studying you will be overwhelmed with the information available on the portal, It will be little more to digest if you do not have any commerce background (Commerce i mean e-commerce way of working buyer, seller, products, catalog, shipping, fulfillment, Basically if you use any of the online shopping site you already know what i am talking about, but here you will be thinking as a developer and not the buyer, because we want to build something in OrderCloud).

Sitecore e-Learning module

As you feel overwhelmed with the information available on the OrderCloud portal, that is where Sitecore e-learning comes in, Personally what i felt is, it gives us steps by step reading material of competencies which are needed to work in Sitecore, It is like instead of reading a full book, someone is giving you the index of the pages to go through flow by flow and that will make more sense as you browse through them, I personally had amazing support of our team mates who already had this guidelines defined for us by Vignesh C , Brijesh Patel , Deepak Kumar , Pratik Satukunvar , So i already had lot of info where to start and plan my exam and schedules, so this blog is for those who are looking for some more info about exam.

So basically as i said you get something like following on e-Learning


which makes more sense competency wise links which you can read through, and believe me, If you refer all the links and sub links inside the main links and read through all the material, you are just done, it has everything to prepare for exam, and kudos to the OrderCloud team of getting such an amazing details still concise documentation out there, In very simple terminology.

In a nutshell, you will need to prepare for following competencies, this information is already available on e-Learning site and on Sitecore

  • Competency 1: OrderCloud Architecture and Conventions 
  • Competency 2: Integration 
  • Competency 3: User Management and Access Control 
  • Competency 4: Environments 
  • Competency 5: Product Management 
  • Competency 6: Order and Fulfillment Management 
  • Competency 7: Troubleshooting

My personal experience of type of questions that i got in exam

I will not talk about how to register for exam or how to do other things of setting up a machine or taking it up from the center, as that information is already available, what i want to talk about is what you should be closely following in the OrderCloud guide 

Make sure you do hands onto OrderCloud API console available for free for trial

There will be questions in the exams about certain aspects of the UI and how to do different things for certain area, so it is very important that you do step by step hands onto OrderCloud portal, You can create your account there and start playing with APIs and Market place, remember e-Learning has those steps and you can do side by side, So you get familiar with the UI and kind of set up it has, Starting from setting up market places, working with market place and buyer, seller set up and API calls of those.

Scenario based questions 

Why it is important to go through full documentation is, there will be scenario based questions, where you will only be able to answer if you know about it, as all options will look correct to you if you do not have gone through the documentation and understood the concept 

OrderCloud has some generalized approach if you are browsing the site as a buyer, or seller or supplier, so context is important factor, in which context you are making the call, and you will be able to answer question related to APIs only if you know this context and details.


API Based questions

It is very obvious if you are appearing for OrderCloud which fully API based and language agnostic, meaning you can write code in any language you know, so It is important for you to go through all API examples given on OrderCloud, You can get scenario based questions from any of the API end point, and if you have not gone through them, all of the options will look same to you, but there will be minor difference and you can only spot if you know about them.


False positive questions

Why reading everything on OrderCloud documentation is important because, you might get questions which might challenge your knowledge about OrderCloud to know what is not available in OrderCloud or what is not correct for OrderCloud, and to point out what is not correct or what is not available, you need to know what is already available, and if you know what is available, you can easily "SPOT THE NOT".


I hope this helps and you get your certification, All the very best and feel free to connect with me if you have any questions or concerns


NOTE : Above are my personal views from my experiences which i had while giving and preparing for exam.

SXA decision making on different rendering approaches and components

May 01, 2022 ·

SXA decision making on different rendering approaches and components

Hi Team,

I am taking a break from a COVEO series for sometime, I will still finish up all of them this year so we have end-to-end guide for it like a crash course

Today, I would like to draft something which I have been asked many times, as well as many of us working with SXA must have came across, the question of "How to decide what kind of option one should choose out of so many option available in SXA, like view over riding, rendering variants, OOTB components, cloned components, Custom components" which one should be used and when is a very common question you all must have came across, I thought to write my view here to simplify the understanding of each and will put it on you end users to decide which one should be selected and when.

Though, The purpose of this blog post is to give brief understanding of which does what and you can cross check with your business need and take the decision, I have experience of working with all of the  following different types and ways of SXA so I will just provide you real life scenarios too, so you can compare it with your business case at hand. 

Overriding view


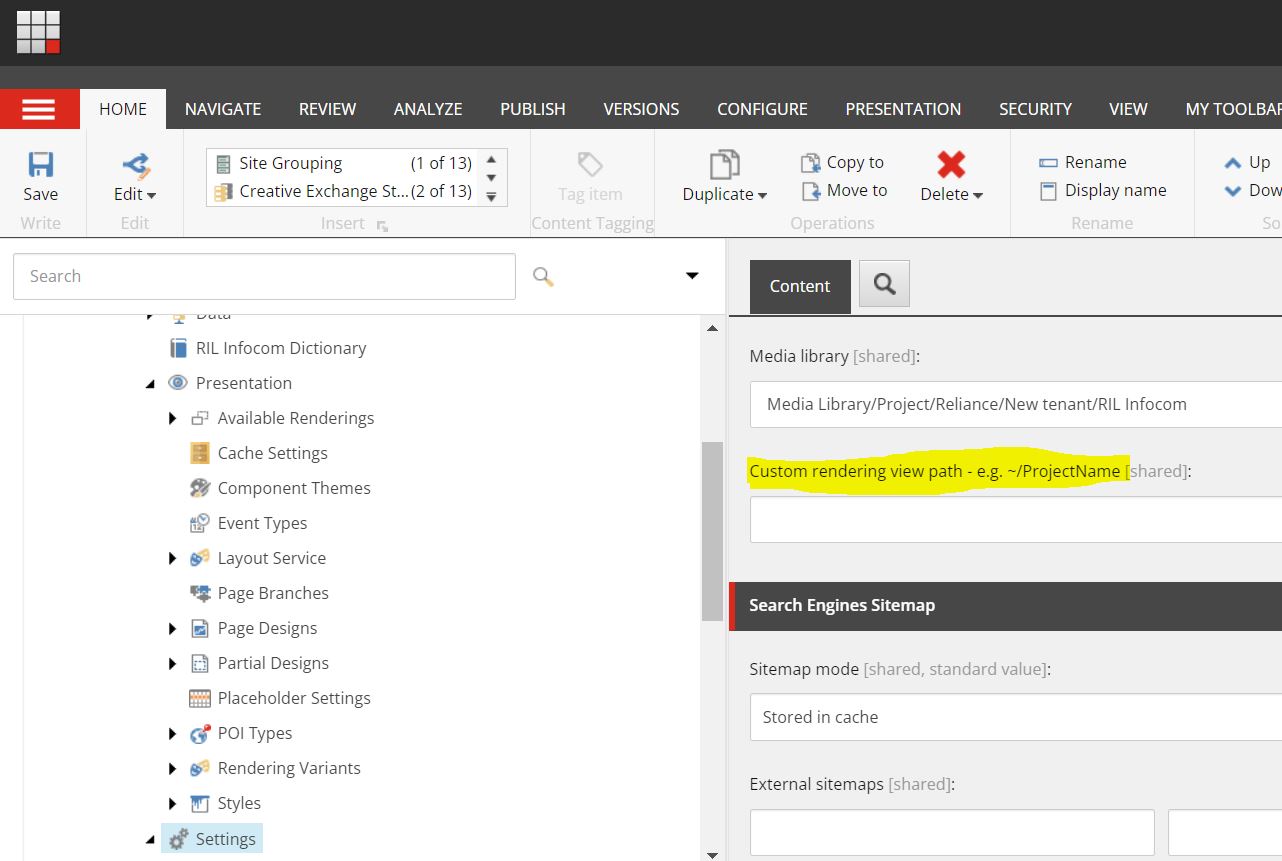
This setting is available under your settings item under the site node, i.e "/sitecore/content/<<Tenant>>/<<Site>>/Settings" and there is a field called "Custom rendering view path"

Beauty of this field is if you have a requirement only to modify the view of existing OOTB SXA, for example if you just want to add some custom mark up to any existing component like promo or any other OOTB component, via this field what you can do is, you can give path to your custom view folder and .cshtml path (name of the component should be same as OOTB component), so now while rendering SXA engine will check if there are any custom folder path defined in this field, it will try to render the view from that location instead of existing OOTB SXA view path, this should be used only when you want existing component's repository and model and everything to work "as-is" but somehow you just want to change the view, so all the business logic of existing component will work "as-is" only HTML will be served from the custom view path folder that you gave.

Here, even if you upgrade SXA, it will update its existing views, your custom view path folder and the view inside it will still be intact, hence you will not loose anything even if you upgrade.

NOTE: Only thing in above approach is for example if you have created custom html view for promo component, so SXA will replace this custom html site wide, if you have a requirement where you want existing promo as well as and another component with little different html structure on other pages, then following is an option.

Rendering Variant

As said above, if you have a requirement where existing component's fields are satisfying your need for your component but you want different variation of same component on different pages, at that time you should create the rendering variants, they are just responsible to create the desire HTML structure from the data source given, you can create completely new type of HTML structure which will get render when you select the variant from editor, Provided the fields that you refer are matching with the OOTB's template and data source is set.

Also rendering variant helps when you kind of have lopping mechanism, so for instance if you have one Author component which displays author bio and blogs written by that author in same component, this type of requirement can also be achieved using variants, It all depends on what kind of template you have used, so if you are identifying blogs written by authors using multi list (using field source), you can use "passthrough field" of variant, so blogs will be your reference field so SXA will when generating HTML for author, it will also loop through these reference field and get blogs written by that author

Pass through field example

Consider you have a item, and it has one of the field which is either multi list or drop list, now in either of case there can be a business scenario where you want to show detail of those fields along with main rendering item, As i said SXA offers so many option of doing this same thing in so many ways, but most optimum is by using a variant and a pass through field (basically it loop through that field and runs through all those item and get those field to display)

In my case, i wanted to show on my blog detail page, i wanted to show the detail of author who wrote that blog


 Here as you can see my blog item has author drop list, and following how you can use it using a variant


and following is the output (of course use case will differ from person to person, but that is an example)


Similarly, Variant also support loading of preexisting components into existing HTML structure, by using "component" field, you can give any rendering and it will be rendered at the exact location in your mark up which you have created in your variant.

You can easily write an article only on how to use variants effectively, but it's not the scope today so i will not get into it, but variant can give you so much and control over things, i would strongly recommend individuals to try to see how many options do variants offer for their individual needs.

NOTE: It is always a good practice to select thumbnail for your variant, so content authors can easily see which variant is for which purpose from the image and they can select accordingly, otherwise it will only show names and it is hard for them to decide which one to select.

Scriban Template  

One of the another powerful feature of SXA is Scriban, They can be used as an "Additional renderers" of fields or tags or even sections

scribans have lot to offer, and you can display additional fields using template syntax provided by SXA

Clone component

Cloning will help when we do not have control over OOTB view either using variant or any other way, so for example if existing OOTB component has 3 fields in its template, title, description and CTA, but your need you want one more image, two more CTA and one more description field, in this type of scenario you can also create a rendering variant and inherit it from your new template, but rendering variant are not for those purposes, in these types of scenario, we should always clone the component and have our fresh version of that component created from OOTB component, now because its totally a new component, we can change the template the way we want and use it as we want as its our own component, remember the rendering pipeline etc. will still remain same, but we will have more flexibility over additional fields.(again you can combine power of variant along with this)

Custom Component

When we want total control over business logic and view, consider reading from third party API and trying to create a view from that, we will need totally custom view

Consider a example where you want to read from a weather API and show the weather of selected cities, here cities can be passed from Sitecore but we will need to make and API call to RSS feed or on some end point to get the weather data, this is where custom component will come into picture, where it will be totally custom view, model, controller, and even repository.

As you can see SXA has so many different ways to offer same thing, so no way is right way or no way is wrong way, it all depends on what is the business need and how can you achieve most efficiently

I am planning to write some of the real tricks or rather smarter ways which we used different scenarios, may be will cover that in the next post

Hope this was helpful.

Thanks for today 

What is sitecore exception of "alarm clock event subscriber"

April 30, 2022 ·

What is sitecore exception of "alarm clock event subscriber"

Hi Team,

Today i will share one of the exception we started seeing in one of our CDs, We all like to keep our logs clean right, any exception can be symptoms of something going wrong

With my surprise, i was seeing following which was being continuously logged

Problem

The exception is

"ERROR Exception in alarm clock event subscriber"

It would have not caught my eyes, But because i was troubleshooting something else and anything in the logs looked suspicious to me and i researched it further and what happens is below

Cause

Sitecore documentation has explained very clear working of what goes behind the scene when Tracker is trying to submit a session to xConnect and what if xConnect is down

Refer : Sitecore documentation

"When the tracker submits a session to xConnect, but xConnect is temporarily unavailable, the tracker classifies this as a transient error (meaning it assumes xConnect becomes available later). The tracker adds the session to a submit queue that, by default, serializes the session to disk. The submit queue service later re-submits the session to xConnect at configurable intervals"

So that means if xConnect is unavailable there is some mechanism where the files gets stored on a file system,  which can be later picked up by the system when xConnect becomes available

Now in this process if xConnect becomes unavailable for sometime and it could be possible that those file which were created on file system by tracker might get stale or corrupt and that is from where the above exception takes birth.

Solution

First of all i wanted to check where on the file system the "Submit Queue" is being created and wanted to double check do i have any files there

and where the tracker will create a file on the disk, that path is mentioned in the \App_Config\Sitecore\Marketing.Tracking\Sitecore.Analytics.Tracking.config


and "dataFolder" is "sc:variable" and can be found in sitecore.config file from where you can get the actual path 

It pointed me to App_Data/Submit Queue folder on my CD server, and because i was getting the exception on my CD0, i went to that path and i saw following files there in queue waiting to be processed


i saw files from 2020 and after further research i took back up of those files and removed those file from the queue, because they were just there and not processed due to some reason

after doing this i went to my CD0 log stream, and i was happy to see that there was no exception and it worked !!!

Conclusion : We all want to keep our logs clean, so some exceptions might not be harming from the processing or performance point of view but its good to get it cleaned, you could also set some automation where if there are files older than some months, you can clean that up to keep your logs clean from these exceptions


Coveo for sitecore get started step by step part-4

September 07, 2021 ·

Coveo for sitecore get started step by step part-4


Hello Friends,

Its been >15 days i did not publish the next chapter as i was traveling on the weekends, but i wanted to make sure i release Part-4 today.

Previously we talked about high-level over view of coveo and what are the building blocks of it and what are some of the most important steps we should know before starting on coveo, As i said earlier as coveo has huge documentation and its a big sea of functionalities, but my purpose is to cover a crash course topics and how easily you can get started with coveo.

So i am thrilled today as i want to cover the hands on where we will create a search page from scratch and we will see what configurations are involved in that process and how indexing is being done and how ultimately data is being shown on the page from coveo index.

Search Page Requirement : I will be creating a simple search page for candidates, so consider a business scenario where i have a huge pool of records in my database where candidates are stored (Probably in Sitecore), now as a hiring manager i want to build a search engine where i can easily search candidates, apply different search filters, view their details.

Now having said above, If we want to start with the fundamental first, We will need following things

1) Item Template  : We will need an item template for candidate where all the possible fields that we want to include or show on page will be there, Basically this is the template for which we intent to index the data as well as want to filter out this template in coveo rule editor.

2) Coveo Index and Field Configuration : As in previous parts we saw what are the essentials and what are important configurations of coveo, so now first thing what we will do is we will make our fields indexable in coveo index

NOTE: in my previous parts i have covered how to set up coveo for your organizations and what will be the farm name and where the index data will go etc. i will use my existing farm which i have created called "D-Farm" in which i am planning to index my data

Now to add specific fields to coveo index configurations, we will go to "Coveo Indexing Manager" from Sitecore's control panel like below 


 Once we are into Indexing manager, you will see your master and web coveo indexes, we will not touch them or rebuild them right now, we will just click on "Fields" option and will make sure our template's fields are also marked as indexable here, see following screen

Configure our template's fields to be indexable

Click on "Fields" and it will list all the available template, we can filter our specific template by searching that into the search box as shown below, and it will list all the fields of the template, we should tick mark those fields which we want to index.


Now after selecting fields, click "Apply and restart", this will update the "Coveo.SearchProvider.Fields.Custom.config" file in our wwwroot\<<Site>>\App_Config\Coveo folder

NOTE: This file is responsible to tell coveo indexer which fields to index, and you should check this file in source control, because you will want to send this file in the deployment so these settings are readily available in higher environments and you do not need to do above process on other higher environments.

3) Now once we are satisfied with the configuration, we can now create Sitecore item using our template, so we can index those data, so i will skip that part here, as those are standard Sitecore items created from our candidate template.

4) Now before we assemble anything on the page, we should first make sure that our data is getting indexed and our coveo configurations etc. are just in place, there are couple of ways to do it
  • We can use our Sitecore's indexing manager where all the indexes are listed and we can index data into different indexes from there, here we will find our coveo_master_index and coveo_web_index, we could trigger indexing from this screen


  • We can go to control panel and coveo indexing manager and from there we can rebuild the indexes which will ultimately build the indexes
  • We can right click on the parent node of our Sitecore item and select option, "Re-index tree" from developer toolbar
5) Now We can go to Coveo Cloud , It will prompt you to login with different options, your organization or you individual need to have license for this to login, in my initial posts i have explained how to register etc.

Here i am considering you already have your organization set up and your farm set up, in my case its "D-Farm", i will go and login into portal and will try to search our data in index to make sure if they are available in index or not


As you can see above i am able to see that my data are now indexed and i can now start on the front end part to assemble coveo components as data are indexed, one more thing also need to check if all fields are indexed or not, you can click on the search result to go into the record and see all the fields which were indexed.

NOTE: If you do not see your records indexed, you might need to see logs and troubleshoot which is a different topic, which we will cover in future post, but you can use coveo's health check functionality like below to see if coveo is working fine


Clicking on "Diagnostic" will show you all the very details where you can see if things are fine or you need further troubleshooting.

Show time: Now, consider that your data is rightly available in coveo and now you are all set to assemble the components on to the page, very first step is to install the coveo package (In my previous blog post Part-2 i have shown what are the components that ships and gets installed in the package and how can you create different coveo items from it.)

So please refer to previous post PART-2 to know how we can get access to coveo components and their templates and functionalities, so we can start assembling them, also if you read my Part-1 which mentions what are the mandatory components to get started, so now let's start assembling the components

Creating a Search Page and assembling of components

As i said earlier in one of my post that there is a documentation available from coveo about following best practices or things to consider before you start, if you have not yet seen Part-3 , find that PDF link here, to read more about what coveo recommends.

Now i will straight away move towards practical implementation of how to assemble coveo components.

Choosing a layout for displaying results

Coveo provides its default view to render the results, but in almost 99% cases in real project, there will be a need where you will need your custom design and custom HTML you want to display for results

For example in my project, my need was to show the results like 3 cards in one row, and it should show 12 cards on the page by default, meaning 4 rows of 3 cards each and there will be see more button a user can click and see other results by clicking "See more" button and it will again load another 12 cards.

Let me show you the layout i was intending to build (Though the amazing design was already given to us, by designers, we now needed to convert them into working HTML). Just to give you more idea, i am putting the wireframe down below

As you can see the page is intended to have these two columns, on left you can see facets, We will talk about facets in coming future post, and on right hand side you can see 12 cards, each card will show details of a candidate, and on see more there will be lazy loading of another 12 cards, on top we have sorting via which we can sort results.

Now, we are interested only in right hand side today in this post, We will be creating our own custom html and tell coveo to use our custom HTML instead of its default html to render the cards.

To full fill above need, we will need to assemble few coveo component on our page and configure them so that they read from our index as well as show our custom HTML too.

We will be talking about three most important components here to achieve the right hand side part

1) Coveo Search Resources
- We already have talked about this component in Part-1, but to give you highlights, this is a mandatory component for any coveo search page and it is needed so that it can load coveo specific JS and CSS, You can read more on my Part-1 or on coveo documentation.

2) Coveo Search Interface 
- This is the main component that we will need to use, remember i talked about writing a rule specific to our candidate template to read and display only candidate specific records out of the full index (index can have data of multiple template but we only want to show candidate data.), this is the component which gives us the ability to write rule and filter results from the index before displaying in the browser.

Also When you add this component on the page few other components will automatically be added onto the page like "Automatic boosting", "Query Filter", "Query Ranking" etc. we will not talk about them here, you can read more on coveo documentation online.

3) Coveo Results List
Responsible for displaying results, It provides configuration to select two layouts Card and List, There is also a possibility of giving user a choice to select between those two. (using Coveo Result Layout component).

4) Coveo Results Template
Coveo provides two out of the box templates types, As i said above in the post, if you want to have control over the html and the structure how the results are displayed, this is the component provides that, Both of below template enables "Underscore.js" syntax.
  • File Result Template 
          This is physical file based template, meaning we can create our own HTML file and put it on specific folder and later on tell coveo to use that template, we will see that soon.
  • Item Result Template 
          This is data source driven template, so it needs the html script to be in the data source from where the component can pick what structure to display.

Phew !!! Hope things are clear till now, Now its time to assemble those component from experience editor and connect them with index as well as configure result template and other things, basically we should have the page up and running with us after the blog post.

NOTE: Remember coveo provides its own placeholders when different components are dragged-dropped, in my case i will be adding other containers and column splitters etc. too in those placeholder just to make sure i get the desire out put using import/export of that page and our FEDs can style it and i can import it back into my Sitecore.

Assembling components

Ok, now i will just create an item where i want to use as my search page, and assemble all those components, because i am using SXA, i already have a partial design which my context page item is using, so i will assemble those on the page design

Very first thing i will do is i will create a partial design where i can put all my components, and i will put all the mandatory components first which are Coveo Search Resources, Coveo Search Interface, Coveo Search Result List

As i have said once you add coveo components, it gives its own placeholders where you can put other components.


As you can see in above image, i am just putting this component in "main" placeholder of our partial design

Next, step is to add other components like below


Another component i would like to put is "Coveo Search Interface", you can see in the backdrop of the image, coveo search resource is also there and after that we will add "Coveo Search Interface".

Now, the moment you add "Coveo Search Interface", It also adds some default components as well as opens up the placeholder where we can put other components like below

Now, we will add the container and the columns splitter, remember its not coveo specific but because my page style required to have column splitter i am adding that, and on left we will have FACETS and on right hand side we will have our resulting cards.

Before we assemble "Coveo Result List" and "File Result Template", We will need to create those configuration data source item in coveo global settings item in Sitecore, so we will first create them and after that we can give those data source in corresponding components 

Coveo Global Components Settings

You can download the sample coveo items from coveo example page, and if you have installed coveo package you can also create these items from choosing from insert option and selecting appropriate coveo template to get all below items, I have already explained that in Part-2. so whatever the way you do, you will end up with getting all coveo data source items like below 


Now, i will show settings and configuration which are must to get the desire results 

As we talked before, we will be using "File Result List Template", that means we will have our own custom HTML template created on the disk in the folder "C:\inetpub\wwwroot\<<Site>>\Coveo\Hive\templates", so i will create a cshtml file and give that file name in one of the datasource settings.

Custom File Result List HTML file

On above path i,e "C:\inetpub\wwwroot\<<Site>>\Coveo\Hive\templates" i will create my custom template file which will have coveo specific syntax to read data from index, and as we already have seen that out data is in index, so you can find my HTML below (below is just small part of my HTML)


This HTML will differ from project to project depending on how you want to show one specific record, in my case this is the HTML of one specific card, i will save this file on the location mentioned above and give it a name "MyCustomFileResultTemplate.cshtml"

Now, we should create a data source configuration for our "Coveo Search Template" and create a new file result list datasource and configure our new template name into it which we created above.


And once data source item is created, we can give name of our new custom template there, so instead of default template we can have our custom HTML rendered like below 


 NOTE: Remember we will select all these data sources when we assemble components on our partial design, so it will automatically get these configurations instead of default behavior.

Now next up is to create data source item for "Coveo Search Interface", this is very important because out of all the indexed document, we only want to show our candidate specific data on the page, Remember in the starting of this blog i mentioned we will use "Item Template" to be filtered, we can do that be below configurations 


NOTE: There are other different settings that you can tweak in different data source items, but i will put it on you to check and try on your end

Now, We have the needed items created, so let's go back to our partial design and add "Result List", and "File Result Template" components and configure our data sources 

Let's first add "Search Result List", Before that Let's change the data source of "Coveo Search Interface" to point to our recently created data source so that it filter our results from all the other data

so let's open our partial design and find "Coveo Search Interface" and edit its data source and give following (Path of the newly created one above)


Now, Lets add Coveo File Results List component on to the page in existing coveo place holder and provide the data source which we have created for it above with our custom result template so it displays the result as we want


After selecting the proper data sources and our custom template, the page should look something like below, remember before doing these, i already had couple of export given to FED and i also had lot of imports hence the things are coming styled for me, in normal case, there will not be any custom CSS apart from coveo, you will need to give those pages to FED to style them as per your need.

NOTE: as i said earlier, my look and feel needed me to put column splitter in existing coveo placeholder and inside left and right column, we will put out components, so on right hand side i have placed our coveo file result list, coveo result list components.


As you can see the data is already started showing up from the index, and also its showing as per our custom html template.

Now this page can be given to FED and they can style it and we can import it back to get it perfectly styled on our end

In next post i will show you how to create facets on left hand side and in coming posts, i will also show you how can we write client side coveo events to do some very important tasks

Hope this was useful for all of you.